Home Blog Page 41

The 5 Most Popular Watch Brands

0

Most Popular Watch Brands

From the least popular to the most coveted, here are the five watch brands that sparked your interest in 2019:

Also read: Panda Express Menu

5. BREITLING

Léon Breitling was a skilled watchmaker who, in his workshop in Saint-Imier. He made ingenious clocks and measuring instruments. He played a significant role in developing the wrist chronograph and is a leader in this complication. Breitling is one of the only watch brands globally to equip all of its creations with officially chronometer-certified movements, the pinnacle of precision, and one of the few brands with its mechanical chronograph movements. During the conquest of the skies, the firm was present at all times. Thanks to its reliable, robust, and efficient instruments.

4. PATEK PHILIPPE

Since its creation in 1839, Patek Philippe has never ceased to innovate and develop its watches. The company stands out for its ability to adapt (or even anticipate) its times and keep innovation as its sole watchword (a choice reflected in the variety and complexity of its models). Patek Philippe watches display a timeless design and it can pass down over several generations while revealing foolproof technology clearly.

3. CARTIER

The Cartier adventure began in the middle of the 19th century when Louis-François Cartier took over the Adolphe Picard jewelry workshop in Paris. Cartier’s know-how is an alliance between technique and creativity that has never ceased to surpass itself. It was the Santos watch that in 1094 marked Cartier’s arrival in the field of watchmaking. Among the most sought-after examples on Barnebys are the Cartier Tank and the Cartier Santos. Finally, in 2017, a Tank was sold at Christie’s for 337,000 euros, a record for the model. This watch’s value was due to its mechanism or its complexity and its history: it belonged to Jacqueline Kennedy Onassis.

2. OMEGA

In 1848, Louis Brandt, a young watchmaker from Chaux-de-Fonds, opened his workshop. It was here, in the family villa, that he founded the company that would become Omega, the brand behind the most acclaimed technical innovations, such as the coaxial escapement or the first fully anti-magnetic movement. The brand has established itself as one of the leaders in the watch industry. The models most sought after by our users are the Omega Seamaster, Speedmaster, Constellation, and also Omega Gèneve.

1. ROLEX

It all started when Hans Wilsdorf, founder of the brand, created the first hermetic wristwatch, the Oyster, before developing it into a range of models that have become iconic. The Rolex:

  • Designs;
  • Manufactures;
  • Components of watches;
  • And also history is inextricably linked.

The brand is displayed at the most prestigious golf, sailing, tennis, motorsport, and horse riding events, and also contributes to important cultural and scientific projects. Especially, the Rolex Submariner, Daytona, and Datejust are the three most sought after models at Barnebys.

Also read: How To Relieve Back Pain Naturally

6 Incredible Hamilton Watches Crafted For The Gentleman

0

Incredible Hamilton Watches

The timepieces from Hamilton get crafted incredibly to give precision of features and style. These beautiful timepieces have accurate and reliable functions topped with aesthetically beautiful designs. A remarkable combination notable to the brand that makes the craftsmanship of Hamilton watches stands truest to excellence.

It is a known fact that watches from Hamilton lines celebrate the prowess of men. Their timepieces range in variations to cater to the delight of the gentleman. These watches are a perfect mix of elegant style and superb functionality. Here are six magnificent timepieces that get intricately crafted for the pleasure of men.

Hamilton H64465733 Stainless Steel Black Dial

The Hamilton watches for men are the finest for their classy effect. This timepiece comes beautifully in black dial with indexes in Arabic numeral. The silver-tone hour and minute markers make the total attraction. In addition, it has H-40 motion that makes the time movements accurate and attractive.

It is a timepiece of beautiful features that gets noticed firstly in the case structure. The material has stainless steel mixed with sapphire crystal that resists scratch damage. It has a see-through back that makes the time viewing appealing. Then the waterproof ability of 50 m allows men to dive into their adventures.

Hamilton H38425120 Stainless Steel White Dial

There is a flawless and clean feeling with white color. It is a simplicity that appeals dramatically radiant. It is eminent to this timepiece as the dial sets lovely in white. The kind of shade that expresses the straightforward bravery of men. It has indexes and hand markers that set the mood of luxury in silver.

The case of this timepiece puts the total cover of sophistication because of its material. It has a stainless steel radiance that flows well with sapphire crystal. In addition, this scratch-resistant case has a round shape that appears sturdy. Finally, the functionality is undoubtedly remarkable, like 80 hours of power reserve and 50 m water resistance.

Hamilton H24535331 Rubber Band Skeleton Dial

An anticipated uniqueness flows to this timepiece as the dial structure appears in skeleton design. This intricately crafted structure makes this watch stand out from the rest. Then the parade of black hue puts a tasteful luxury in place. Finally, this timepiece full of vibrance makes a gentleman one of a kind.

Move forward with the wonders of the features this timepiece brings. It has H-10-S caliber movements that make time accurate. This automatic timepiece gets enclosed in a case of stainless steel with a unique shape. Plus, the functions like 50 m water resistance and 80 hours extended usage do magic.

Hamilton H32475140 Stainless Steel Blue Dial

Blue represents the color of manly features, which gets centered on this watch’s dial. It flows, covering the dial entirely like a raging ocean in majesty. The case in steel puts strength with sapphire crystal that adds luxury to the details. It is shaped in a round and 40mm size that fits a manly charm.

The elegant design of this timepiece equates fully with its features. It has H-10 caliber time movements that make time tracking convenient. The stainless steel bracelet is a spell of class and durability. It works well with the fast lifestyle of men as the power reserve extends use by 80 hours. Then the waterproof function is dependable in 50 m.

Hamilton H13519711 Leather Band White Dial

This watch is nothing short of fantastic because the shape in Tonneau makes a difference. A gentleman will love the unique structure that elevates the look. The white dial puts an add-on sophistication together with Roman numeral indexes. Plus, the Alpha-shaped hand markers take this timepiece to its beautiful leap.

A timepiece that lives truest to traditional manual winding style puts a vintage niche differently. The casing steals the limelight as the material gets bold in steel and sapphire. It has waterproof features that deserve a high score. Then it supports long extended use with 80 hours of power reserve.

Hamilton H38735501 Stainless Steel Brown Dial

This timepiece radiates a sun ray-like brown dial. The brown color magnificently flows to hand markers in yellow gold. Then the case made of stainless steel covers elegantly in the sapphire crystal that connects gently to a leather bracelet. The function serves its purpose well, like 50 m water resistance and 42 hours power reserve.

Takeaway

What you wear at times defines you as a person, and these timepieces from Hamilton create their collections that can speak genuinely of men. It gets crafted incredibly to develop watches that give specific functionality and designs that spark beautifully. Let these timepieces take part in the courage of gentlemen and make them stand out.

How You Can Maintain a Healthy Home in a Post Covid World

Maintain a Healthy Home in a Post Covid World

Maybe the COVID-19 pandemic isn’t over yet. But the beginning of the end is very apparent, at least in the U.S., while other countries, like India, continue to struggle with its sickly and deadly effects. But as we gradually approach what will certainly be a post-COVID world sooner than later, a renewed sense of cleanliness, wellness, and health in the home is pervasive.

In short, people will continue to be germ/virus conscious long after the last case of COVID-19 is diagnosed. Who wants to take chances on getting the disease just because it’s said to have been eradicated?

But COVID isn’t the only thing to worry about when it comes to hidden dangers inside the home. Says a new report, most of us spend at least half our lives inside our homes. At the same time, we rarely take into account the direct connection between our housing and our overall health.

Home health concerns aren’t just limited to germs and the COVID-19 virus either. For instance, maybe your filthy air conditioner filter needs replacing. Or maybe your toxic chemical-filled, hard tap water requires filtering by a Brita under sink water filter. Perhaps moldy carpets need to be ripped out and hard wood floors installed in their place. Perhaps the chipping, lead-based paint needs to be removed. All of these changes will make your home a healthier place to live. But for now, let’s concentrate on keeping your home as germ free as possible.

That said, here are some effective ways you can maintain a healthy home both while the COVID-19 Pandemic winds down and after it’s been declared eliminated.

Plastic and Steel

Viruses tend to hang around on plastic and stainless steel surfaces longer than other materials like wood. You should be consistently spraying all surfaces regardless of their make, and also scrubbing them to make sure they are clean.

The Kid’s Toys

There’s nothing more covered in germs than little kid’s rubber toys. You will want to wash them in warm soapy water on a daily basis. This includes the toys your kids use in schools and at home.

If you can’t wash them yourself, then run them in the dishwasher and/or spray them with a 70-percent ethyl-alcohol rinse.

Cell Phones

You should clean your phone every time you return from an outing or work. Use an alcohol rinse or an alcohol wipe.

Flooring

Floors are easily covered not only in dirt and dust, but whatever you’ve stepped in outside is easily transported inside. That is, you keep your shoes on upon entering your home, like most people do. The best solution to dirty carpets is to use a steam mop along with a spray cleaner.

However, whether or not steam kills germs and/or something as powerful as the COVID-19 virus, is something that’s still up for scientific debate. But steaming can’t hurt. Some people will tell you steam kills up to 99-percent of all germs. One benefit of steam is that it will not leave a chemical residue which can harm your pets or your kids.

Clothes

With people starting to get out and about more often, you still need to wash your clothing and clothe masks in warm/hot soapy water and preferably in a washing machine in soft, filtered water. Clothing with less outdoor exposure, like pajamas, can be washed in cold water.

Windows

Windows gather dust, dirt, and grime on the outside, germs and bacterial agents on the inside. Use an alcohol-based spray inside and out. But on the inside the experts will tell you a mixture of vinegar and water will do the trick. Who knew?

Dust Covered Rugs

You should vacuum at least once per week, pandemic or no pandemic. Believe it or not, your home is filled with toxins. Vacuuming and dusting at least once per week will assist in mitigating your exposure.

Bathrooms

This is probably no brainer, but you need to clean your bathroom every other day, including floors and walls. Make sure you get all the handles and spigots. Yes, you will need to clean the toilet thoroughly, maybe even on a daily basis if you have some rugrats running around. That means getting up inside the bowl to clean all the little nooks and crannies. It’s not a glamorous job, but proper hygiene is very important.

Your Food

You are not the only person to touch your food. Not by a long shot. You are merely the last person to touch it. That means you should wash all your fresh produce and fruits prior to consuming. Always rinse thoroughly. Even if your iceberg lettuce comes wrapped in clear plastic, never serve without washing it. It’s harvested not only with the help of chemicals and other toxins to keep the bugs at bay, but also manure. That alone should make you want to clean your veggies.

Also, it pays to rinse your chicken as soon as you remove it from the package. The same goes for packages beef and pork products.

The Air

Air purifiers for every bedroom will help keep the environment free of dust and toxins. This is especially important if you suffer from allergies. Air fresheners, it should be noted, do not clean the air. They also leave a chemical residue that is said to cause more damage than good.

Also, You can find more helpful resources at Popbom.

5 Easy Ways to Lose Weight Fast

0

You know the recipe when it comes to losing weight: eat fewer calories and burn more. You also probably know that most fad diets and express methods don’t work as promised. These expert tips will help you achieve your goal.

Write Down What You Eat For a Week

Numerous studies have made known that people who keep a diary eat about 15% less food than those who don’t. Keeping track of your diet is a simple habit of thin people. Watch out for weekends: A study from the University of North Carolina found that people consume 115 more calories on weekends, primarily through alcohol and fatty foods.

Also, pay special attention to spreads, dressings, condiments in sauce, sugary drinks, and quick snacks. They can make a big difference in your ability to lose weight.

Add 10% to the Amount of Calories You Think You Are Consuming Each Day

If you think you are consuming 1,700 calories per day and don’t understand why you cannot lose weight, add 170 calories to your estimate. There is a good chance that this number is closer to reality. Adjust your eating habits accordingly.

Make sure you know how many calories to consume per day to lose weight.

Find a Companion Online

An online companion can help your motivation to lose weight as per a study from the University of Vermont. The researchers studied the participants for 18 months. Those who were assigned an online weight loss companion were more successful in maintaining their weight loss than those who only had a support group they could only meet in person.

Find Yourself a Positive Mantra

Have you heard an inspirational phrase recently? Get inspired! If you put all the emphasis on the things you can’t do, like resisting a pastry or going out for a walk every day, there’s a good chance you’ll never be able to do it. Instead, believe it or not, repeat a positive phrase to yourself, like a mantra. “I’m going to resist dessert today.” Or “I’m going to go out for a walk today.” By repeating it to you, this sentence will become a reality.

After Lunch, We Stick To the Water

At lunch, you can choose to drink a juice or a sweet drink. For the rest of the day, stick to water instead of juice or soda. Check out the list of the best and worst ways to hydrate. The average American would consume 245 calories per day in a soft drink. That’s approximately 90,000 calories per year or … 25 pounds!

Studies show that in addition to calories, sugary drinks are not as filling as less sweet drinks or healthy snacks.

How to Remove Gel and Acrylic Manicures not Damaging Them?

0
  • Table of Contents

    Introduction

    Gel and acrylic manicures are luxurious, beautiful, and fun. However, their removal is where many people inadvertently damage their natural nails. The temptation to peel, pick, or pull off chipped polish is strong—but doing so can seriously harm your nail beds and result in weak, thin, painful nails that take months to recover.

    The good news: removing gel and acrylic manicures properly at home is straightforward, affordable, and takes minimal time. With the right approach, you can safely remove these manicures without damaging your natural nails, keeping them healthy and strong for your next polish application.

    This comprehensive guide covers everything you need to know about safe nail removal: why proper removal matters, step-by-step removal techniques for both gel and acrylic nails, what products work best, aftercare essentials, and how to maintain healthy nails between manicures.

    Why Proper Nail Removal Matters: Understanding the Damage

    Before diving into removal techniques, understanding why proper removal is critical will motivate you to do it right.

    What Happens When You Pick or Peel Polish Off

    The damage process:

    When you pull, pick, or peel off gel or acrylic polish:

    • You’re removing the polish along with layers of your natural nail

    • The nail bed (living tissue beneath the polish) gets damaged

    • The nail plate (the hard outer layer) becomes thin and weak

    • Multiple layers of keratin are stripped away

    • Micro-tears occur in the nail structure

    Visible damage results:

    • Nails become paper-thin and fragile

    • Increased breakage and peeling

    • White spots or horizontal lines appear

    • Nails become painful and sensitive

    • Discoloration and ridge formations

    • Texture becomes rough and uneven

    • Recovery takes 3–6 months of growth

    Why this happens:
    Gel and acrylic polish bonds to your natural nails. When bonded, they’re adhered to the nail plate. Peeling them off removes not just the polish, but also the outer layers of your nail—it’s like peeling paint off wood and removing some of the wood’s surface with it.

    Long-Term Consequences of Improper Removal

    Immediate effects (weeks 1–2):

    • Extreme sensitivity to touch

    • Pain when nails touch hard surfaces

    • Difficulty performing everyday tasks

    • Visible damage and weakness

    Short-term effects (weeks 2–8):

    • Persistent breakage

    • Nail peeling and flaking

    • Continued pain and sensitivity

    • Aesthetic concerns (damaged nails visible)

    Long-term effects (months 1–6):

    • Slow recovery as new nail grows out

    • Permanent damage to nail bed if severely injured

    • Chronic weakness in affected nails

    • Potential permanent nail problems if repeatedly damaged

    Why take the time to remove properly?
    15–30 minutes of proper removal prevents months of nail damage and pain. It’s simply not worth rushing.

    Understanding Gel and Acrylic: What You’re Removing

    Different polish types require different removal approaches. Understanding what you’re removing helps you remove it properly.

    Gel Polish: Structure and Characteristics

    What gel polish is:

    • Liquid polymer resin that hardens under UV light

    • Forms a flexible, glossy coating on the nail

    • Bonds to the nail surface through the gel’s stickiness and UV bonding

    • Lasts 2–3 weeks before growing out or chipping

    Why gel is popular:

    • Beautiful, chip-resistant finish

    • Long-lasting (2–3 weeks)

    • Glossy appearance lasts entire wear period

    • Relatively thin application (less damage than acrylics)

    • Easy to apply (fewer layers than acrylics)

    Why gel requires careful removal:

    • Bonds strongly to nail surface

    • If peeled off, takes nail layers with it

    • Acetone necessary to dissolve the polymer bonds

    • Must soak adequately for clean removal

    Acrylic Nails: Structure and Characteristics

    What acrylic nails are:

    • Mixture of liquid monomer and powder polymer

    • Forms a hard plastic-like coating

    • Can be applied thickly for length and strength

    • Lasts 3–4 weeks before needing fills or removal

    Why acrylic is popular:

    • Highly durable

    • Can be sculpted into shapes

    • Allows significant length

    • Customizable colors and designs

    • Very long-lasting

    Why acrylic requires careful removal:

    • Extremely hard and durable (strong adhesion)

    • Takes much longer to soak than gel

    • Requires extended acetone exposure

    • Thicker application means more potential for damage

    • Must soak long enough for complete dissolution

    How to Remove Gel Manicures: Step-by-Step Guide

    Gel removal is relatively straightforward when done properly. Here’s the complete process.

    Materials Needed for Gel Removal

    Essential:

    • Acetone (pure, 100% acetone works best)

    • Cotton pads or cotton balls

    • Aluminum foil or plastic wrap

    • Small bowl (for acetone)

    • Rough nail file (not fine-grit)

    • Cuticle stick or wooden nail stick

    • Moisturizing oil (coconut, argan, or jojoba oil)

    • Hand cream or moisturizer

    Optional but helpful:

    • Nail dehydrator (removes any remaining moisture)

    • Glass bowl (doesn’t react with acetone like plastic can)

    • Non-woven cotton pads (absorb better than regular cotton)

    • Cuticle oil with vitamin E

    Step-by-Step Gel Removal Process

    Step 1: Prepare Your Space (5 minutes)

    • Choose well-ventilated area: Acetone has strong fumes; ventilation is important

    • Have time available: Plan 30–45 minutes total

    • Gather all materials: Don’t start without everything

    • Wash hands: Clean nails before starting

    • Prepare workspace: Use towel to protect surfaces

    Step 2: File Off the Top Layer (5 minutes)

    • Use rough nail file: 100–120 grit

    • Gently file the shine: Remove the glossy top layer

    • Don’t file too aggressively: You’re removing the protective shine, not the polish

    • Don’t remove all polish: Just dull the surface

    • Work methodically: File each nail evenly

    Why this step matters:

    • Acetone works faster when shiny surface is gone

    • Creates surface for acetone to penetrate

    • Reduces soaking time significantly

    Step 3: Protect Your Skin (5 minutes)

    • Apply moisturizing cream: Thick cream or oil around nail beds

    • Cover surrounding skin: Acetone dries skin; protection essential

    • Avoid getting cream on nail: Only nail plate needs soaking

    • Pay special attention: To cuticles and skin around nails

    Why this step matters:

    • Acetone is harsh on skin

    • Protects against drying and irritation

    • Prevents painful contact dermatitis

    Step 4: Apply Acetone (2 minutes)

    Option A: Direct application with cotton pads

    • Saturate cotton pad with acetone

    • Place directly on nail

    • Can be fiddly (pads may slip)

    • Simpler setup

    Option B: Wrapped application (preferred method)

    • Tear small pieces of aluminum foil (2×2 inch squares)

    • Saturate cotton pad with acetone

    • Place cotton pad on nail

    • Wrap foil tightly around fingertip

    • Foil holds cotton in place

    • Much more effective than direct application

    Application tips:

    • Saturate cotton thoroughly

    • Ensure full nail coverage

    • Wrap snugly but not painfully tight

    • Check that foil isn’t touching acetone (skin contact)

    Step 5: Wait Patiently (10–15 minutes)

    • First check at 10 minutes: Peek under foil to assess progress

    • Look for peeling: Gel should be lifting and peeling

    • If not peeling: Leave for additional 5 minutes

    • Maximum soak: 20 minutes (longer isn’t necessary and increases skin exposure)

    What to expect:

    • Gel becomes soft and cloudy

    • Edges begin lifting from nail

    • Gel starts peeling away

    • You may smell acetone fumes

    Step 6: Gently Remove Gel (5–10 minutes)

    • Remove foil and cotton carefully

    • Gently peel gel: Use wooden stick or plastic pusher

    • Work slowly: Don’t force gel off

    • Peel from edge: Start where gel is lifting naturally

    • Use cuticle stick: Gently nudge gel away from nail

    • Never force: If gel isn’t peeling easily, soak longer

    Critical technique:

    • Gentle pressure, never aggressive pulling

    • Work methodically nail by nail

    • If gel resists, re-apply acetone and wait longer

    • Patience here prevents nail damage

    Step 7: Remove Remaining Polish (5 minutes)

    • Use cuticle stick: Remove any remaining polish pieces

    • Gentle scraping: Don’t dig into nail

    • Work along edges: Where residue collects

    • Accept slight residue: Better to leave trace than damage nail

    Step 8: Rinse Thoroughly (3 minutes)

    • Wash with soap and water: Remove acetone completely

    • Scrub hands: Get between fingers and under nails

    • Dry thoroughly: Acetone residue can continue drying

    • Wash again: Two washes ensures complete acetone removal

    Step 9: Intensive Moisturizing (5 minutes)

    • Soak nails in coconut oil: 5–10 minutes

    • Apply moisturizing cream: While nails still damp

    • Massage cuticles: Olive or argan oil

    • Don’t skip this: Acetone severely dries nails

    Why this step is essential:

    • Acetone strips all moisture from nails

    • Immediate rehydration prevents brittleness

    • Coconut oil provides best penetration

    • This step determines your nail health after removal

    Total Time for Gel Removal: 30–45 minutes

    How to Remove Acrylic Nails: Step-by-Step Guide

    Acrylic removal takes longer but follows similar principles.

    Materials Needed for Acrylic Removal

    Essential:

    • Acetone (100% pure)

    • Bowl (ceramic or glass, not plastic)

    • Larger bowl with hot water (for warming acetone)

    • Nail file (100–120 grit rough file)

    • Cuticle stick

    • Moisturizing oil

    • Towel

    • Timer (critical for acrylics)

    Optional but helpful:

    • Ketone-based nail dehydrator

    • Nail brush

    • Non-woven cotton pads

    Step-by-Step Acrylic Removal Process

    Step 1: Prepare Your Space (5 minutes)

    • Choose well-ventilated area: Acetone fumes strong with acrylics

    • Have 60–90 minutes available: Acrylics take longer

    • Gather all materials: Nothing worse than mid-process shortage

    • Prepare hot water bath: You’ll need this ready

    • Wash hands: Start with clean nails

    Step 2: File Down Acrylic (10 minutes)

    This step is critical for acrylics—more important than for gel

    • Use rough file (100–120 grit): Necessary for acrylics

    • File vigorously: Acrylics are hard; aggressive filing needed

    • Remove as much as possible: File down to near nail surface

    • Don’t panic about dust: Acrylic dust is normal (ventilate)

    • File edges to thinner: Thin edges dissolve faster

    Why this step is critical:

    • Acrylics are much harder than gel

    • Filing reduces soaking time significantly

    • May reduce soak time from 60 to 45 minutes

    • Every minute of filing saves 5 minutes of soaking

    Step 3: Warm the Acetone (5 minutes)

    Warm acetone dissolves acrylics much faster

    • Pour acetone into small bowl: Fill about halfway

    • Place small bowl in larger bowl: Bowl-in-bowl setup

    • Add hot water to large bowl: Not boiling, but hot

    • Warm for few minutes: Acetone should be warm to touch

    • Check temperature: Should be hot but safe to touch

    Why warm acetone matters:

    • Warm acetone dissolves acrylics 20–30% faster

    • Reduces soak time significantly

    • Still requires 45–60 minutes even when warm

    • Makes a substantial difference in comfort

    Step 4: Soak Nails (45–60 minutes)

    This is the main difference from gel removal—much longer soak

    • Dip all fingers: Into bowl of warm acetone

    • Keep nails submerged: All 10 fingers in acetone

    • Set timer for 45 minutes: Check progress at this point

    • Don’t remove early: Acrylics need full soak time

    • Maintain warmth: If acetone cools, refresh with warm water

    What to expect:

    • Acetone will cool down as nails soak

    • You can refresh bowl with hot water periodically

    • Acrylic will begin softening and clouding

    • Nails may feel sensitive to warmth

    • Strong acetone smell throughout

    At 45-minute mark:

    • Gently nudge edge with cuticle stick

    • See if acrylic is soft enough

    • If very soft: remove (start at step 5)

    • If still hard: soak additional 10–15 minutes

    Step 5: Gently Remove Acrylic (10–15 minutes)

    • Remove nails from acetone: One at a time

    • Use cuticle stick: Gently lift acrylic edge

    • Work slowly: Don’t force acrylic

    • Peel carefully: From edge, working inward

    • If acrylic resists: Return to acetone and soak longer

    Proper technique:

    • Gentle, patient approach

    • Never yank or force

    • Use wooden stick (won’t damage nails)

    • Work methodically nail by nail

    Step 6: Remove Remaining Acrylic (10 minutes)

    • Continue soaking if pieces remain: Return to acetone

    • Gently file remaining: Use fine file, light pressure

    • Use cuticle stick: Scrape off softened pieces

    • Work methodically: Don’t rush this step

    Step 7: Rinse Thoroughly (5 minutes)

    • Wash with soap and water: Multiple times

    • Remove all acetone residue: Important for nail health

    • Scrub between fingers: Acetone gets everywhere

    • Dry thoroughly: Prevent further drying from acetone

    Step 8: Intensive Moisturizing (10 minutes)

    • Soak nails in coconut oil: 10–15 minutes minimum

    • Apply rich hand cream: Nails will be very dry

    • Massage cuticles: Vitamin E oil or argan oil

    • This step is non-negotiable: Your nails depend on it

    Post-soak care:

    • Leave moisturizer on for several hours

    • Apply again before bed

    • Sleep with moisturizer on nails

    • Reapply frequently for first 24 hours

    Total Time for Acrylic Removal: 60–90 minutes

    Products and Tools: Making the Right Choices

    Acetone: The Essential Product

    What acetone is:

    • Chemical solvent that dissolves acrylic and gel polymers

    • Pure acetone (100%) works fastest

    • Available at drugstores, beauty supply stores, online

    Purchasing acetone:

    • Pure acetone: Best option (100% acetone)

    • Acetone-based nail polish remover: Works but slower

    • Avoid: “Gentle” removers (don’t dissolve acrylics adequately)

    • Cost: Pure acetone is cheapest ($3–$8 per quart)

    • Storage: Keep in cool, dark place; has long shelf life

    Acetone safety:

    • Highly flammable (keep away from heat/flame)

    • Strong fumes (use in ventilated area)

    • Drying to skin (protect with cream)

    • Wear gloves if skin very sensitive

    • Do not ingest or inhale fumes

    Nail Files: Choosing the Right One

    File grit matters:

    • 100–120 grit (rough): Best for filing acrylic

    • 150–180 grit (medium): General maintenance

    • 240+ grit (fine): For gentle work, finishing

    File material:

    • Metal files: Durable, work well on acrylics

    • Glass files: Gentlest, best for natural nails (but wear out)

    • Ceramic: Good balance of durability and gentleness

    Avoid:

    • Emery boards (break easily)

    • Very fine-grit files (too gentle for acrylic filing)

    Moisturizing Products: The Most Important Part

    Best oils for nail moisturizing:

    Coconut oil:

    • Penetrates deeply into nails

    • Anti-bacterial properties

    • Affordable ($5–$15 per jar)

    • Best choice for post-removal

    Argan oil:

    • Rich, nourishing

    • Absorbs well

    • More expensive ($15–$40 per bottle)

    • Excellent for ongoing care

    Jojoba oil:

    • Similar to skin’s natural oil

    • Absorbs quickly

    • Good for sensitive nails

    • Moderate cost ($10–$25)

    Olive oil:

    • Budget-friendly

    • Works adequately

    • Slightly heavier texture

    • Good emergency option

    Cuticle oil with vitamin E:

    • Specific for cuticles

    • Vitamin E supports healing

    • Cost: $8–$20

    • Excellent for post-removal care

    Aftercare: Protecting Your Nails Post-Removal

    Proper aftercare determines how quickly your nails recover.

    Immediate Aftercare (First 24 Hours)

    First few hours:

    • Keep moisturizer on nails

    • Reapply every 2–3 hours

    • Avoid water (soaking makes nails soft and more prone to peeling)

    • Avoid harsh chemicals and soaps

    Nighttime:

    • Apply thick layer of moisturizer

    • Sleep with moisturized nails (don’t rinse off)

    • Consider cotton gloves to keep moisture in

    Next morning:

    • Apply fresh moisturizer

    • Assess nail condition

    • Plan for at least 2 weeks before next manicure

    Short-Term Aftercare (First Week)

    Daily routine:

    • Apply moisturizer 3–4 times daily

    • Avoid water when possible

    • Avoid harsh cleaning products

    • Wear gloves if doing dishes

    • Don’t file or manipulate nails

    Activities to avoid:

    • Wet nail polish (nails too fragile)

    • Harsh chemicals (nail polish, cleaning products)

    • Excessive water exposure

    • Aggressive scrubbing

    What to expect:

    • Nails may feel thin and weak

    • Sensitivity to cold water (normal)

    • Slight discomfort with pressure

    • Gradual improvement over days

    Medium-Term Aftercare (First 2–4 Weeks)

    Continuing care:

    • Moisturize twice daily

    • Keep nails short (less stress on fragile nails)

    • Avoid nail polish if possible (let nails breathe)

    • File gently if needed

    • Trim regularly

    Expectations:

    • Nails gradually become stronger

    • Sensitivity decreases

    • Nail plate thickens as new nail grows

    • By week 4, nails relatively normal

    When to get next manicure:

    • Wait at least 2–3 weeks

    • Some recommend waiting 3–4 weeks

    • Longer wait = healthier nails

    • Skip one or two manicure cycles to strengthen nails

    Long-Term Aftercare (Monthly and Beyond)

    Monthly routine:

    • Deep moisturize with oil soaks

    • Trim and file regularly

    • Keep cuticles pushed back

    • Use moisturizing hand cream daily

    Between manicures:

    • Apply cuticle oil nightly

    • Use hand cream throughout day

    • Wear gloves for cleaning/gardening

    • Keep nails reasonably short

    When ready for next manicure:

    • Ensure nails are healthy (no white spots, peeling, or brittleness)

    • Wait full recovery time before applying gel/acrylic again

    • Give nails a “break”—alternate with regular polish

    • Consider going without polish periodically

    Preventative Care: Protecting Your Nails Between Manicures

    While removing manicures properly is critical, protecting nails between applications is equally important.

    Taking Breaks Between Manicures

    Why breaks matter:

    • Nails need recovery time

    • Continuous manicuring causes cumulative damage

    • Breaks allow nails to naturally shed damaged layers

    • Healthier nails mean better manicure results

    Recommended schedule:

    • Get manicure → wear for 3 weeks → remove properly

    • Take 2–4 week break (no polish)

    • Repeat cycle

    This means:

    • 3–4 manicures per year (every 3 months)

    • Not weekly or monthly continuous manicures

    • Nails get 2–4 months recovery yearly

    Nail-Healthy Practices

    Daily habits:

    • Wear gloves for cleaning (chemicals damage nails)

    • Moisturize nails daily

    • Keep nails trimmed

    • File in one direction (prevents splitting)

    • Don’t use nails as tools

    Nutritional support:

    • Adequate protein intake (nails are keratin)

    • Biotin supplementation (supports nail growth)

    • Iron (deficiency causes brittle nails)

    • B vitamins (support nail health)

    Lifestyle factors:

    • Adequate hydration

    • Minimize stress

    • Get quality sleep

    • Manage chronic health conditions

    Frequently Asked Questions About Nail Removal

    Q1: Can I remove gel/acrylic nails without acetone?

    A: Not effectively.

    Why acetone is necessary:

    • Acetone dissolves the polymer bonds

    • No other accessible solvent works as well

    • Alternatives like rubbing alcohol don’t dissolve acrylic/gel

    • Water won’t dissolve them

    Alternatives that don’t work:

    • Alcohol (minimal effect)

    • Water (completely ineffective)

    • Oils (minimal effect)

    • Vinegar (ineffective)

    What actually works:

    • 100% acetone (most effective)

    • Acetone-based nail remover (works but slower)

    • That’s basically it

    If avoiding acetone:

    • Go to salon for professional removal (still uses acetone)

    • Wait for nails to grow out completely and cut them off (takes months)

    • Just accept that acetone is necessary

    Q2: How long should I soak my nails?

    A: Depends on polish type:

    Gel polish:

    • 10–15 minutes average

    • Can be done in 10 with proper filing

    • Don’t exceed 20 minutes (diminishing returns)

    Acrylic nails:

    • 45–60 minutes typical

    • Can be up to 90 minutes if very thick

    • Filing first significantly reduces time

    Factors affecting soak time:

    • How thick the application was

    • How much you filed first

    • Acetone temperature

    • How well acetone is applied

    Don’t rush:

    • Better to soak too long than too short

    • Forcing off undissolved acrylic causes damage

    • Each application is different

    Q3: Why does my nail hurt after removal?

    A: Common and usually temporary.

    Causes of pain:

    • Nerve endings in nail bed are sensitive

    • Acetone and removal process irritate them

    • Nail bed may be slightly damaged

    • Nails are thin and sensitive post-removal

    Pain should:

    • Be mild (not severe)

    • Decrease within 24–48 hours

    • Resolve within a week

    If pain persists:

    • Indicates possible nail bed damage

    • Increase moisturizing

    • Avoid anything touching nails

    • See doctor if worsening

    How to reduce pain:

    • Extensive moisturizing

    • Avoid cold water (causes pain)

    • Keep nails short

    • Don’t file or manipulate nails

    • Be extra gentle

    Q4: Is it normal for my nails to be thin after removal?

    A: Yes, very normal.

    Why nails thin out:

    • Gel/acrylic application thins nails over time

    • Removal process removes outer nail layers

    • Acetone drying effect

    • Nail needs time to recover thickness

    Timeline for recovery:

    • Noticeably better: 1–2 weeks

    • Much better: 3–4 weeks

    • Fully recovered: 2–3 months

    • Takes time for new thick nail to grow out

    What helps:

    • Moisturizing (prevents further damage)

    • Keeping nails short (less stress)

    • Nutritional support (protein, biotin)

    • Avoiding polish/manicures temporarily

    Q5: Can I apply new gel/acrylic immediately after removal?

    A: Not recommended.

    Why waiting is important:

    • Nails need recovery time

    • Damaged nail bed needs healing

    • Thin nails are more susceptible to damage

    • Immediate reapplication causes cumulative damage

    Recommended waiting time:

    • Minimum: 2 weeks

    • Better: 3–4 weeks

    • Best: 4–6 weeks for severely damaged nails

    Why timing matters:

    • Gives nail bed chance to regenerate

    • Allows new thicker nail to grow out

    • Reduces cumulative damage risk

    • Results in healthier, stronger nails long-term

    Q6: Should I file my nails after removal?

    A: Minimally and gently.

    When filing is okay:

    • If edges are rough and catching

    • File very gently with fine file

    • Only if absolutely necessary

    Avoid:

    • Aggressive filing

    • Shaping nails significantly

    • Filing wet nails

    • Over-filing (causes peeling)

    Better approach:

    • Keep nails short initially

    • Trim with clippers rather than filing

    • Wait until stronger before filing

    • File in one direction only

    Q7: What if my nails are peeling after removal?

    A: Common occurrence, preventable/treatable.

    Causes:

    • Excessive acetone drying

    • Insufficient aftercare moisturizing

    • Nails still too weak

    • Nail bed damaged during removal

    Treatment:

    • Aggressive moisturizing (multiple times daily)

    • Coconut oil soaks (10 minutes daily)

    • Avoid water exposure

    • Keep nails short

    • Don’t apply polish yet

    Prevention for next time:

    • Intensive post-removal moisturizing

    • Don’t wait so long between applications

    • File less aggressively

    • Wait longer between manicures

    Timeline:

    • Peeling usually stops within 1–2 weeks

    • Takes 4–6 weeks for peeling nails to fully grow out

    • Once peeled layer is gone, nails normal

    Q8: Can I use home remedies instead of acetone?

    A: Not effectively for complete removal.

    Why home remedies don’t work:

    • Acrylic/gel polymers are specifically formulated

    • Acetone is the solvent they’re designed to respond to

    • No common household product dissolves them adequately

    What people try that doesn’t work:

    • Vinegar (minimal effect)

    • Rubbing alcohol (doesn’t work)

    • Coconut oil (lubricates but doesn’t dissolve)

    • Hot water (softens slightly but doesn’t remove)

    • Baking soda paste (doesn’t work)

    The reality:

    • You need acetone for proper removal

    • It’s inexpensive ($3–$8)

    • Available everywhere

    • Most efficient and effective option

    Better use of home remedies:

    • Use for aftercare moisturizing (coconut oil excellent)

    • Don’t try to use them for removal

    Q9: How often can I safely get gel/acrylic manicures?

    A: Much less frequently than many people do.

    Safer frequency:

    • 4–6 times per year (every 2–3 months)

    • Not every 2–3 weeks continuously

    • Includes breaks between applications

    The temptation:

    • Manicures look beautiful and feel luxurious

    • Easy to get them every 2–3 weeks

    • But continuous manicuring causes damage

    Healthier approach:

    • Get manicure (wear 3 weeks)

    • Remove and take 2–4 week break (no polish)

    • Repeat

    Result:

    • 3–4 manicures yearly

    • Much healthier nails long-term

    • Nails get recovery time

    • Less cumulative damage

    Q10: When should I see a doctor about my nails?

    A: If damage is severe or doesn’t heal.

    See a doctor if:

    • Nails extremely painful (beyond mild sensitivity)

    • Pain worsens after initial recovery period

    • Nails show signs of infection (redness, swelling, pus)

    • Dark streaks or spots appear

    • Nails aren’t improving after 4 weeks

    • Nails become severely discolored

    • Nail separating from nail bed

    When damage is normal:

    • Mild sensitivity (improves within 1 week)

    • Thinness (recovers over 2–3 months)

    • Slight discoloration (improves as nail grows)

    • Temporary dullness (recovers with moisture)

    Professional help is appropriate:

    • Nail fungus concerns

    • Potential infection

    • Severe damage from improper removal

    • Nails not recovering normally

    Your Nail Care Action Plan

    Before Your Next Manicure

    1. Decide: Is continuous manicuring worth potential nail damage?

    2. Plan removal time (don’t rush)

    3. Gather supplies (acetone, files, oil, cotton, foil)

    4. Research your nail type

    During Removal

    1. Follow step-by-step process (don’t skip steps)

    2. Be patient (rushing causes damage)

    3. Use proper filing technique

    4. Soak adequately (more is safer than less)

    After Removal

    1. Intensive moisturizing (non-negotiable)

    2. Take break before next manicure (2–4 weeks minimum)

    3. Apply moisturizer nightly during break

    4. Assess nail health before next application

    Moving Forward

    1. Consider spacing manicures further apart

    2. Prioritize nail health over constant polish

    3. Use breaks to let nails recover

    4. Alternate manicure types (gel, acrylic, regular polish)

    5. Give nails “makeup-free” time regularly

    Final Thoughts: Healthy Nails Are Worth the Time

    Your nails deserve proper care. Taking 30–90 minutes to remove gel or acrylic nails safely is a small investment in your long-term nail health.

    The choice is simple:

    • Rush removal (5 minutes) = months of damaged, painful nails

    • Proper removal (30–90 minutes) = healthy nails ready for next manicure

    Your future self will appreciate the care and effort you put in today.

    Start today:

    1. If you currently have gel/acrylic, remove it properly using this guide

    2. Take a 3–4 week break with no polish

    3. Moisturize nails daily during break

    4. Plan your next manicure strategically

    5. Space out applications to protect nail health

    Beautiful, healthy nails are achievable. With proper removal, adequate breaks, and consistent care, you can have gorgeous nails that remain strong and healthy long-term.

How to Prevent Migraine: The Most Effective Solutions

Headache or migraine is a prevalent ailment that most people suffer from at some point in their life. Fortunately, it is a temporary situation, which usually disappears on its own after a few hours or, in the most severe cases, in a couple of days. In this article, we will tell you how to remove a migraine or, at least, how to reduce its effects so that it is as bearable as possible.

How to Remove Migraine: Prevention Factors

Although there is no foolproof method, you can reduce the chances of suffering from headaches or migraines by following the following guidelines:

Correct Visual Problems

As already mentioned, refractive problems (myopia, hyperopia, astigmatism, presbyopia, etc.) can cause headaches if they are not corrected correctly. Therefore, if you tend to suffer from migraines frequently, you recommend that you go to the ophthalmologist. He can evaluate your vision and rule out any possible problem related to vision, either due to an undiagnosed refractive problem or a change in the view’s graduation.

Avoid Long Exposures to Screens

Spending a long time in front of a screen (for example, a computer screen) is also one factor that most often contributes to the generation of migraines and headaches. Rest for at least 10 minutes every hour will help prevent its appearance.

Place the Screen at a Suitable Distance

In addition to limiting the time spent in front of the screens, they are also important at the appropriate distance. In this sense, it is recommended that they be placed at least 40 to 45 cm from the eyes. As well as that, the place where you work is well ventilat and has adequate ambient lighting to see both the screen and the space around it correctly.

Avoid Habits That Can Cause Migraines

An essential recommendation for knowing how to remove migraines is to avoid certain habits that can trigger them. In this sense, the consumption of alcohol, tobacco, or caffeine is related to an increase in migraines’ number and intensity in patients who suffer from this problem. Limiting its consumption, or better eliminating it, usually contributes very effectively to mitigating the episodes and power of headaches.

Promote Healthy Habits

Likewise, it is also imperative to prevent migraines to lead a healthy life. In this sense, it is recommended to eat a balanced diet and practice physical exercise regularly.

Sleep Properly

Another element that can help prevent the appearance of migraines is to sleep properly. It implies doing it on a mattress and with a suitable pillow and maintaining correct postural hygiene during sleeping hours. Also, it is essential to sleep at least 8 hours a day and go to bed and get up always at the same time.

Also read: 5 Tips to Maintain a Healthy Brain

How To Wear Colored Boots?

0

Colored Boots?

Your pairs of black ankle boots are real essentials to have in your shopping. However, you can brighten up your outfits by daring with color. Yellow, red, green, blue brightly colored boots brighten up your business. They know how to stand out by creating a colorful and particularly original touch. Succumb to the fashion of bright ankle boots to compose a daring, feminine, and fashionable look. By emphasizing your shoes, you catch the eye and choose where it should land first when you look at you. This fall and winter, stay warm while looking stylish. To avoid fashion faux pas, follow our tips for composing vibrant looks, but no less chic.

Also read: The Treatment Of Your Spa

Which Pair Of Colored Boots To Choose?

Wearing color in winter is possible! The significant trend of the season, colored boots are a real must-have. Pointed, rounded toes, block or thin heels, smooth leather, or suede, the models are available. Choose shoes that will match your favorite clothes to create many everyday looks.

Colors such as red, curry yellow, khaki, camel, forest green, or even petrol blue are ideal for warming up your look. Your shoe becomes a real fashion accessory that brings style and elegance to your outfit.

To highlight your figure with brightly colored ankle boots, choose a heeled model that will lengthen your legs.

Which Pair Of Colored Boots To Choose?


What To Wear Your Colorful Boots With?

Color is featured in the wardrobes. The colorful ankle boots go perfectly with neutral shades such as black, but also white, beige or gray. The goal is to harmonize the whole and keep an elegant silhouette. The total monochrome look with a touch of color on the feet is a careful bet that contrasts with elegance.

Transform a BCBG look into a contemporary look by teaming your colored ankle boots with a long skirt or dress. Bet on a pair of red boots with a stiletto heel, for example, which will add pep to your outfit. Finish the company with a leather jacket for a rock and glam touch.

What To Wear Your Colorful Boots With?

Casual and feminine look with a pleated skirt and colored boots. Avoid too sexy pieces and prefer to combine your dress with a mesh sweater or a shirt and an oversized scarf, for example.

You can also bet on raw, dark blue jeans, the simplicity of which will be enhanced by the color of the shoes. I prefer sober pants and avoid perforated or faded denim, which may overdo it. Complete the set with a straight-cut coat and a trendy little bag.

Also read: 4 Essential Vitamins for Beautiful Skin

Is it possible to sell T-shirts online like a pro in a few steps?

0

Is it possible to sell T-shirts online

T-shirts never go out of fashion. They are a vital part of every wardrobe. The custom T-shirt industry is fast exploring multiple ways of connecting with the target audience. There is an increasing demand for customized T-shirt printing, which has given an impetus to its revenues. With the help of clever entrepreneurial strategies, you can identify your target audience and start your T-shirt business. If you are thinking of online firms, T-shirt printing is a lucrative opportunity. Both for veterans and beginners, it is promising e-commerce entrepreneurship. If you are interested in e-commerce stores, you must look for multiple avenues and platforms for getting that universal reach. You can start with relatively simple designs and work on their details with time.

For starting any business, you must have a proper plan at hand. You have to conclude on your business model for thriving in this highly competitive eCommerce platform. For attaining success, you have to make every possible effort to make the store stand out. You have to come up with high-quality commodities if you want to win hearts. Try to constantly brainstorm your ideas and learn the best ways of branding. Although it is a daunting process, it is the most fundamental one in building an eCommerce platform.

Fundamentals of online T-shirt entrepreneurship

For initiating your online business, you have to look for multiple openings. Although it is a cheap and straightforward way of running your store, it is not that easy. It is because of the high competition which the online platform offers to every entrepreneur. Running e-commerce enterprises will require you to constantly modify your plans according to the needs and demands of society. Initiating a T-shirt business requires constant support from the commercial world. Remember that selling your products on the digital platform is not easy. You will have to make your products unique and attractive.

How profitable is an online T-shirt enterprise?

If you are thinking about revenue margins, do not strain much. Over time, it will eventually add to your experience. That is what this business requires. The more awareness you possess, the better it is for your future endeavours. When you are initiating the company, you need minimal start-up costs. For boosting the business, you might have to look for a constant source of funds. You can go to financial institutions that are ready to give you a loan. You can select the print on demand option, which is quite trendy. For this, you have to decide on your printing option. With different webinars and seminars featuring, you can grab a lot of tactics from them. For starting a profitable venture, you must have unique ideas at your disposal.

The process of starting in few steps

The first step in the initiation of online business is the selection of a niche. When you are in the T-shirt industry, there are multiple options before you. It would help if you decided on your place for the store. For creating unique entrepreneurship, you have to decide on your brand image and thereby provide comparable products. Invest your time in doing research and fixing the new subcategory. You may look through online stores to understand what is in trend. Jot down important points which look impressive to you. Following this, you may target the niche which interests you.

Come up with your unique design

You can design your T-shirt for launching the store. Although you may be a novice at it, try to amalgamate your vision and idea. Come ahead with attractive options for building the foundation of the store. Although it may appear easy, it is not. You must be creative and unique when working on the T-shirt design. Multiple design websites are available for you to explore. If you are not comfortable, you can also take the help of professionals. There are local designers available for this service. Apart from this, online freelance outlets can also provide you with reliable services.

Come up with your unique design

Print on demand

These days print on demand is going down well with the younger lot. For creating high-quality products, custom clothing Canadais using multiple printing options. Their designs are creating a buzz. If you want to leave a decent impression, you will have to experiment with many options. Look for the best printing method that suits your finances. Check for quality products and try to experiment with various designs. Try to process your thoughts so that you can come up with something attractive.

Only when you have a proper plan can you validate your entrepreneurial activities. Remember that honesty and transparency are the two pillars of any enterprise. If you want to improve your revenues, you will have to go that extra mile. From designing to font to colour, you will have to discuss your plans with others. For creating unique products, you have to look into prospective design options. You may also use the feedback to improve your merchandise, so that will help in your future.

Also Read: How to Make Money with Online Games?

The Best Chest Exercises In Bodybuilding

0

Build Up The Pectorals

The pecs are one of the muscles very popular with bodybuilders, and that’s understandable. Thick and broad pecs with a perfect abdominal strap are often one of the first goals. So I said that sharing the best pectoral exercises with you was an exciting thing for you to progress faster. In bodybuilding, knowledge of exercises is a basis for building the pectorals. You will have to perform them using different training techniques to shock them and break more and more muscle fibers in your pectoral area.

The Pectoral Muscles

The pectorals are made up of several bundles. Each part can be developed using specific exercises.

The Large Pectoral And Its Bundles

The upper bundles are the upper part of the pectorals. It starts from the collarbone.

The pectoralis major medial part is the largest area of ​​the pecs, often a source of the rib cage’s right thickness.

The lower bundles of the pectorals are the lower part of the pectoralis major. Exercises like the decline press are often used to distinguish the lower chest from the start of the abdominal strap.

Why Work The Pectorals In Bodybuilding?

Let’s face it the pectorals are a muscle group that we all want to develop. A thick rib cage means power. Pleasant to work out Strength training exercises for the pectorals are often the first exercises you will do. Let’s get down to business and immediately tackle the description of the best pecs exercises to strengthen the pecs.

The Best Chest Exercises

Dumbbell bench press, a pec exercise for thickness

A pectoral exercise is considered a basis with the bar bench press; it allows a more fantastic execution range than its counterpart.

Execution of the movement: Starting position, lying on a horizontal bench, dumbbells in hand, elbows bent parallel to the floor. Raise the load vertically until your arms are practically straight and join the dumbbells. Then come back down while controlling the load while bending your elbows.

Muscles worked: You mainly work the pectoralis major, the shoulder, and the triceps’ anterior part.

Variants

You can also perform this chest exercise by rotating the handles at the end of the concentric phase.

Precautions

Avoid lowering your elbows too low. They must remain parallel to the ground.

Bench Press, An Unmistakable Pectoral Muscle-Building Exercise

This exercise constitutes a basis in muscle building of the pectorals. No doubt you’ve heard of it before.

The movement’s execution: Starting position, lying on your back on a flat horizontal bench with your feet firmly placed on the ground for stability and balance. Eyes under the bar. Position the hands with spacing more excellent than the width of the shoulders. Unhook the bar and descend, controlling the load up to the chest. Develop the bar, then breathe out at the end of the movement.

Muscles worked: The bench press is a pectoral exercise that uses all of the pecs such as the pectoralis major, the pectoralis minor, and the anterior part of the shoulder and the triceps.

Variants

You can perform this pectoral strength training exercise on a guided frame to secure yourself. It allows initially to concentrate on the movement without the notion of balance and stability.

Precautions

Avoid practicing this exercise of pecs with too heavy loads when you begin. Also, limit its use if you have long forearms because the pectoralis major’s stretch will be maximum.

Inclined bar press to develop the pecs in their high portion

Here Is An Exercise To Strengthen The Pectorals In A Targeted Manner

Execution of the movement: Sitting on a bench at 45 °, eyes under the bar. Grasp the bar overhand with a space greater than shoulder-width apart. Unhook the bar and go down to the chest, then go up.

Muscles worked: You mainly work the upper bundles of the pectoralis major, the anterior part of the shoulder, and the triceps.

Variants

This chest exercise can be done with a guided frame.

Precautions

Be sure to control the movement.

COVID-19 in Children Symptoms and Prevention

What is COVID-19?

COVID-19 stands for “coronavirus disease 2019”. It is caused by a disease called SARS-CoV-2. The virus emerged in late 2019 and quickly spread around the world.

People with COVID-19 may have a fever, cough, difficulty breathing, and other symptoms. Breathing problems occur when the infection affects the causes of pneumonia and the lungs.

For most people with COVID-19, symptoms are not severe, but others can be. Residents have been asked to stay home and isolate themselves from others in many areas. COVID restrictions have prevented people worldwide from traveling as well. The aim is to try and slow the spread of the virus.

This article discusses COVID-19 in children. Information on COVID-19 in adults is available in a separate document.

How Covid-19 Spreads?

How Covid-19 Spreads

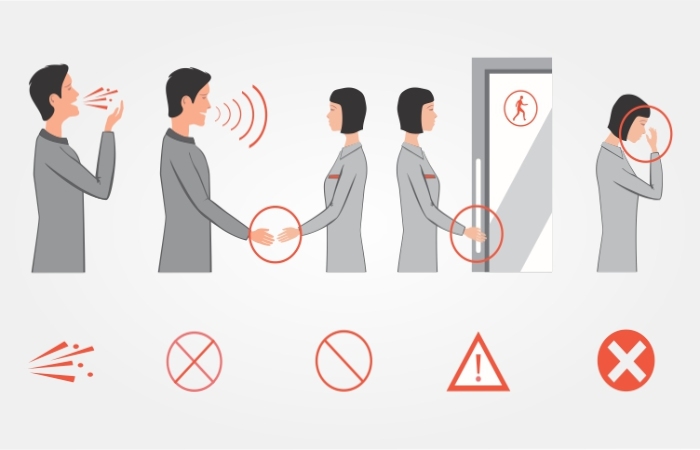
The virus that causes COVID-19 is spread primarily from person to person, usually when an infected person sneezes or coughs near others. The virus is found in tiny particles from the infected person’s lungs and respiratory tract. These particles can move quickly through the air to other people nearby. In some cases, such as in confined spaces where the air is recirculated, the virus in these particles can spread to other people further away.

The virus can transfer easily between people in the same household. However, it can also be spread during encounters between people who talk to each other near, shake hands, hug each other, share food, or even sing together. Dining out increases the risk of infection because diners are usually close to each other and not wearing masks. Doctors also believe it is possible to become infected by touching a surface contaminated with the virus and then touching your mouth, eyes, or nose.

A person can get infected and spread the virus to others even without showing symptoms. It is why keeping a distance between people is one of the best ways to slow the virus’s spread.

It is strange whether this virus can enter a baby through breast milk if the mother is sick.

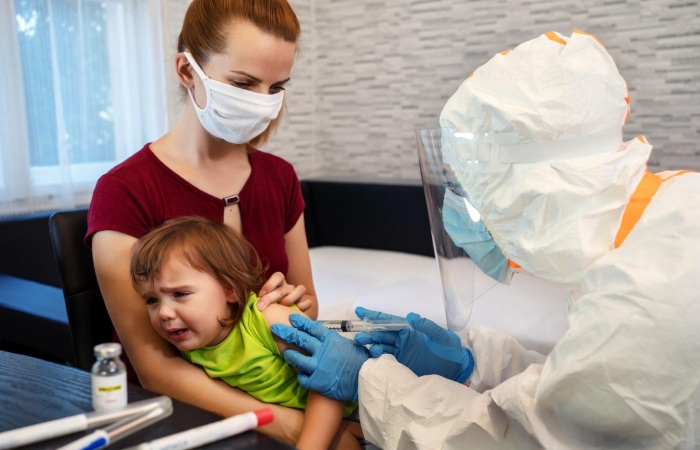
Can children get COVID-19? Yes. Children of all ages can contract COVID-19.

Also, children can pass the virus on to other people. It can be dangerous, especially for older people with other health problems.

Are the Symptoms of COVID-19 Different in Children and Adults?

Are the Symptoms of COVID-19 Different in Children and Adults_

Not really. In adults, common symptoms include fever and cough. In more severe cases, patients may develop pneumonia and have difficulty breathing. Children with COVID-19 can also have these symptoms but are less likely to be very sick. Some children have no symptoms.

Other symptoms can also occur in children and adults. These can include sheer tiredness, chills, headache, muscle pain, sore throat, runny or stuffy nose, diarrhea, or vomiting. Babies with COVID-19 may have difficulty feeding. Rashes on the skin and other skin symptoms also have a virus. For example, some people with coronavirus have small red to purplish spots on their fingers and toes, but why or how often they occur is unclear.

Severe symptoms may be more common in children with health problems, including severe genetic or neurological disorders, congenital heart disease (from birth), sickle cell anemia, obesity, diabetes, chronic kidney disease, asthma, and more: other lung diseases, or a weakened immune system.

Can COVID-19 Cause Other Problems in Children?

It’s not common, but it can happen. In rare cases, children with COVID-19 have developed inflammation that has spread throughout the body. This inflammation can damage organs if the child is not shown to a doctor quickly. Experts use various expressions to describe this disease, including “multi-inflammatory syndrome in children” and “pediatric multisystem inflammatory syndrome.” Symptoms may be similar to those of another condition called “Kawasaki disease.” They understand :

  • Fever lasting more than 24 hours
  • Stomach pain, vomiting, or diarrhea
  • Rash
  • Red eyes
  • Headache
  • Extreme fatigue, confusion, or irritability
  • Breathing difficulties

Call your child’s doctor immediately if your kid develops one or more of these symptoms.

What Should I Do If My Kid Has Symptoms?

What Should I Do If My Kid Has Symptoms_

Call their doctor or nurse if your kid has a fever, cough, or other signs of COVID-19. They will tell you what to do and if your child needs to be seen by a healthcare professional.

If you care for your kid at home, your doctor or nurse will tell you what symptoms to watch out for. Some children with COVID-19 who have been showing signs for about a week have worsened their health. Your doctor or nurse can tell you when to call the office and the emergency room.

Here are the Symptoms

  • has difficulty breathing;
  • has pain or a feeling of tightness in the chest;
  • appears disoriented or does not behave as usual;
  • cannot wake up or stay awake.
  • has severe stomach pain;
  • has blue lips or face;

Call the doctor or nurse for advice if you have a baby and have difficulty feeding naturally.

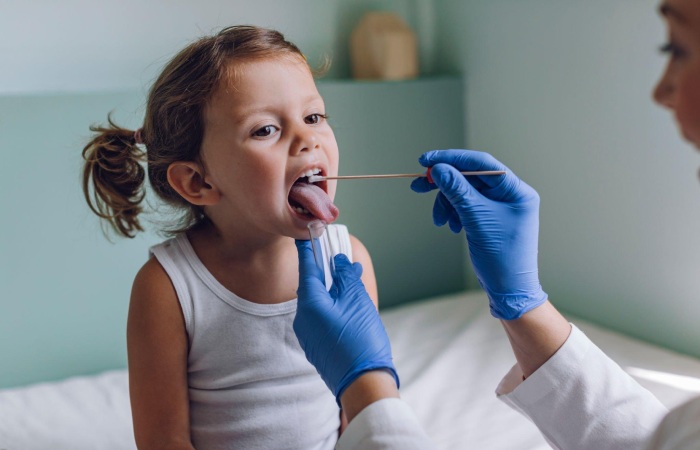
Should my child test? If a doctor or nurse suspects that your child has COVID-19, he/she can take a swab with cotton swab in their nose or mouth to have them tested. These tests can help the doctor determine if your child has COVID-19 or another disease.

You must see a doctor or nurse to get a test in some areas. In others, organizations offer tests that are accessible to everyone. Depending on the lab, getting test results may take several days.

If you feel your child has been in close contact with someone who has COVID-19, they must diagnose, even if they do not show any symptoms. Call their doctor or nurse if unsure where to do this test. Whether or not your child is diagnose, he or she should remain in self-quarantine at home after exposure. It means staying home and away from other people as much as possible.

The safest thing to do is quarantine yourself for 14 days. Some public health departments may allow people to stop the quarantine earlier, especially if they test negative. If you are unsure how long the quarantine is for your child, contact your local public health unit or ask their doctor or nurse.

Even if your child stops quarantining sooner, after possible exposure, you should continue to monitor symptoms for 14 days. If he starts to develop symptoms, call his doctor or nurse immediately. Your child should also be cautious about wearing a mask and social distancing for 14 days.

How Is COVID-19 Treating in Children?

There is no known specific treatment for COVID-19. Most healthy children who suffer recover at home, and their condition usually improves within 1 to 2 weeks.

It is essential to keep your child at home and away from other people until your doctor or nurse tells you that he/she can resume normal activities. This decision will depend on how long it has been since the child’s symptoms first appeared and, in some cases, whether the test result is negative (showing that the virus is no longer in their body).

Doctors are currently studying several treatments to determine if they might be effective against COVID-19. Doctors sometimes recommend trying these treatments or participating in a clinical trial for hospitalized children. A clinical trial is a scientific study that tests new drugs to determine whether they work.