
Table of Contents
My Closet Was a Disaster (Then I Found IKEA)
Okay so my closet was bad. Like really bad. Clothes everywhere. Nothing hung up properly. I couldn’t find anything.
One day I was getting ready for work and just… broke. I had nothing to wear even though I had like 100 pieces. That’s when I decided something had to change.
I went to IKEA. Spent like $300. And completely transformed my closet.
An IKEA closet system isn’t fancy. It’s not boutique. But honestly? It’s life-changing. And affordable.
Here’s exactly what I did and how you can do it too.
Why IKEA Closet Systems Actually Work
Okay so I used to think closet systems were expensive. Like thousands of dollars. Custom closets with the fancy people.
Then I realized IKEA exists. And they’re basically the same thing but you don’t need a second mortgage.
IKEA closet systems work because:
-
They’re modular (add more later)
-
Super affordable
-
Actually look good
-
Easy to install (mostly)
-
You can move them
-
Works in any closet size
Real talk: I was intimidated by the installation. Thought it would be impossible. Took me 3 hours with my boyfriend. Not bad.
What You Actually Need (The Essentials)
Okay so you don’t need EVERYTHING IKEA makes. That’s how you waste money.
Here’s what actually matters:
Closet rods: The horizontal bars where clothes hang. You need these.
Shelving units: For folded stuff, shoes, bags.
Drawers: For underwear, socks, stuff you don’t hang.
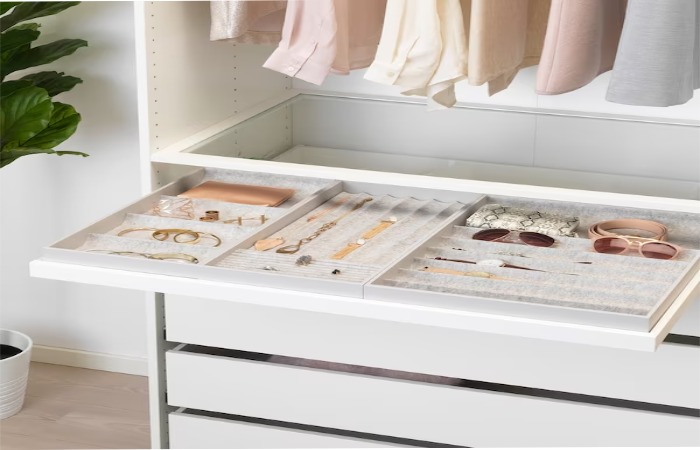
Hanging organizers: For scarves, belts, ties.
Hooks: For bags and robes.
Baskets: For storage that looks cute.
Real talk: Start with just the basics. Don’t buy random stuff. You’ll end up with junk you don’t need.
Step 1: Measure Your Closet (Don’t Skip This)
I know measuring is boring. Do it anyway.
Seriously. This is where most people mess up.
What to measure:
-
Width of your closet (inside)
-
Height from floor to ceiling
-
Depth (front to back)
-
Any weird angles or obstacles
How to measure:
-
Use a tape measure (not a ruler, that’s useless)
-
Measure twice (I’m serious)
-
Write it down (don’t just remember)
-
Take a photo of your closet
Real talk: I didn’t measure properly the first time. Bought stuff that was too big. Wasted money. Measure. Please.
Step 2: Plan Your Layout (On Paper)
Before you buy anything, draw it out.
I know it sounds extra. It’s not. It saves money and headaches.
What to think about:
-
Where does your rod go?
-
What gets folded vs hung?
-
Do you need shoe storage?
-
How many shelves do you actually need?
-
Any hanging organizers?
Real talk: I spent 30 minutes drawing my closet on paper. Saved me from making mistakes. Worth it.
Pro tip: Take a photo of the IKEA closet system online and draw your version with that style.
Step 3: Go to IKEA (Or Order Online)
You can go in-store or order online. Both work.
IKEA closet products to consider:
-
PAX wardrobes (modular, customizable)
-
ALGOT system (wire shelving, affordable)
-
KOMPLEMENT accessories (drawers, shelves, hanging things)
-
PINNIG benches (shoe storage)
-
KALLAX units (shelving)
Real talk: I went in-store and got overwhelmed. Online might be easier. You can take your time and not feel rushed.
Pro tip: Check for sales. IKEA has them all the time. Subscribe to emails.
Step 4: Prep Your Closet (The Annoying Part)
Before you install anything, clear your closet completely.
I mean everything. Out. Gone.
What to do:
-
Remove old rods, shelves, hooks
-
Clean the walls (dust, spider webs)
-
Fill holes from old hardware
-
Let paint dry if you filled holes
-
Measure one more time (I’m not joking)
Real talk: This part sucks. Takes 2-3 hours. But your closet will be fresh and ready.
Pro tip: This is also a good time to declutter. Get rid of stuff you don’t wear.
Step 5: Install Your IKEA System (You Got This)
Okay so installation. It’s not actually that hard. I promise.
Basic steps:
-
Read the instructions (yes, really read them)
-
Get a drill and level (trust me)
-
Install wall anchors if needed
-
Mount the main unit to the wall
-
Add shelves, rods, drawers as you go
-
Double-check everything is level
-
Adjust as needed
Real talk: The instructions are confusing at first. But once you install the first piece, you get it. Watch a YouTube video if you’re stuck. Seriously.
Pro tip: Get a friend to help. Holding things is way easier with two people.
Step 6: Organize Everything (The Fun Part)
Okay so now comes the fun part. Making it look good.
How to organize:
-
Hang heavy stuff on sturdy rods
-
Fold sweaters and jeans (don’t hang, they stretch)
-
Put everyday stuff at eye level
-
Seasonal items up high or low
-
Shoes on shelves or racks
-
Bags in clear organizers
-
Belts and scarves hung up
Real talk: I organized by color. Then by type. Made it way easier to find stuff.
Pro tip: Invest in slim hangers. They save so much space.
Things IKEA Closet Systems Actually Do Well
They’re affordable. Seriously. Mine cost $300 total. Custom closets are $3000+.
They look modern. Not outdated or cheap-looking.
They’re flexible. You can change it up later if you want.
They maximize space. You fit way more stuff.
They make your clothes accessible. You actually wear what you own.
They’re easy to install. Not super complicated.
Real talk: My closet went from disaster to actually organized. I wear more clothes now because I can see them. That’s not nothing.
Honest Stuff About IKEA Closet Systems
They’re not super high-end. Durable but not forever.
Assembly takes time. Plan for several hours.
Instructions can be confusing. YouTube helps.
They’re not custom. You work with what they offer.
Sizing matters. You need to measure correctly.
They work best for smaller spaces. Not ideal for huge closets.
Real talk: They’re great for what they cost. You get what you pay for.
Real Numbers: How Much Does This Actually Cost?
Here’s what I actually spent:
-
PAX wardrobe frame and doors: $120
-
KOMPLEMENT shelves and rod: $80
-
Hanging organizers and drawers: $60
-
Baskets and hooks: $40
-
Slim hangers: $20
-
Total: $320
Real talk: That’s budget-friendly. Most custom closets are $2000+. This is way better.
My Actual IKEA Closet Setup (What I Have)
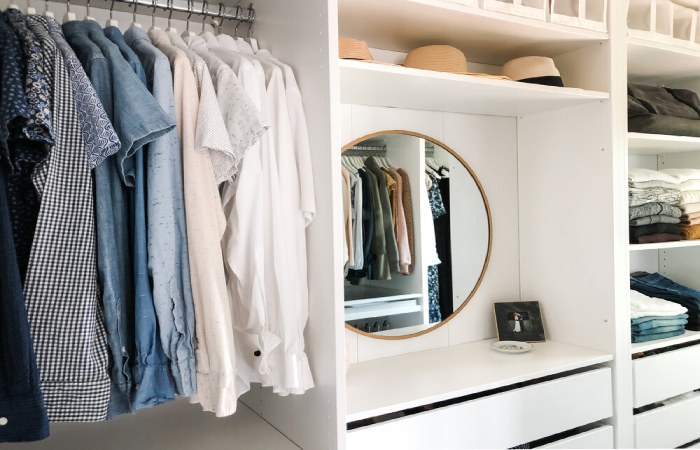
Top shelf: Off-season stuff, bags
Upper hanging rod: Jackets, formal stuff
Lower hanging rod: Everyday clothes, work stuff
Shelves: Folded sweaters, jeans, t-shirts
Drawers: Underwear, socks, accessories
Baskets: Random stuff, scarves, belts
Hooks: Current bags, daily jacket
Real talk: It’s not complicated. Just organized. That’s the point.
Pro Tips I Learned the Hard Way
Measure twice, buy once. Seriously.
Don’t go overboard. You don’t need every IKEA product.
Quality hangers matter. Cheap ones make it look messy.
Lighting helps. Add a small light if possible.
Labels are your friend. Know what’s where.
Seasonal swaps are easier now. Stuff is accessible.
Everything has a home. That’s the key.
The Real Deal About IKEA Closet Systems
Here’s what an IKEA closet system actually does:
It transforms chaos into organized. That’s huge.
It makes getting dressed easier. You actually wear your clothes.
It saves money. Way cheaper than custom.
It’s achievable. You can do this yourself.
It looks good. Not just functional, actually nice.
It changes how you think about your closet. Instead of a dumping ground, it becomes a system.
Next Steps (Do This)
Step 1: Measure your closet (today)
Step 2: Check IKEA online (this week)
Step 3: Make a budget (stick to it)
Step 4: Order or shop (get it)
Step 5: Install (get a friend)
Step 6: Organize (the fun part)